Krita - paint shades of gray on a layer mask
Page 1 of 1 (8 posts)
Tags:
None
|
Registered Member 
|
If I have two layers, the upper layer with a mask, can the mask be modified with shades of gray, using a brush? Masks are created solid black. I figured out how to erase the mask to make it solid white, and how to paint sections of it solid black. But what I really want is to paint the mask, using a brush, with shades of gray. Is this possible?
I've searched diligently every day for the last week for an answer, devoted quite a few hours to experimenting with Krita - the interface takes a bit of getting used to, but it's finally making more sense to me. I even resorted to watching videos, but my old-school brain doesn't absorb information from videos very well. Only today did I figure out how to modify the mask using erase and paint. But if solid black and solid white are my only options for modifying the mask, then unfortunately, Krita won't do the task I'd like to use it to do. So I'm really hoping that painting with shades of gray is possible. Thanks in advance for any assistance, even if the answer is "no, not possible". I'm running OpenSuse 12.1 with Krita 2.5 alpha1, kde 4.8.3. Elle Hmm, my apologies, I thought I was posting to the Krita forum. Did I post in the right place? |
|
KDE Developer 
|
Hi Elle,
Right now, masks use the alpha channel, not the gray channel. So if you want to make a mask 50% transparent, you need to paint or erase on it with a brush with 50% transparency. This is the result of a very old design decision for selections I made when being more or less completely unaware of how masks worked in other applications. We want to change this, but it is quite difficult to do: https://bugs.kde.org/show_bug.cgi?id=217292. |
|
Registered Member 
|
Hi Boudewijn,
Thank you very much for responding. I experimented yesterday, and tried again today, no luck. Perhaps I misunderstand you, or I am doing something wrong. You said: "Right now, masks use the alpha channel, not the gray channel. So if you want to make a mask 50% transparent, you need to paint or erase on it with a brush with 50% transparency." I couldn't find any way to set brush transparency. The Brush tool has an Opacity setting and a Flow setting (not sure what the difference is). Setting both values very low still results in the painted area on the mask being black or white. These settings do affect painting on the layer itself, but not on the layer mask. The Brush Opacity and Flow settings also do affect the mask if I choose Edit, Fill with Foreground Color. But not if I use a brush on the mask. Is there something I'm overlooking? Elle |
|
Registered Member 
|
Hi,
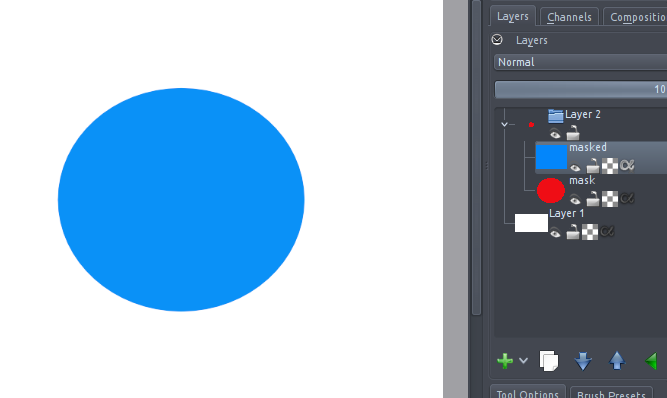
For now you have to play with the opacity of the brush mask itself (in the preset editor, brush tip tab, select "Soft brush", and play with the opacity curve, or use a semi-transparent "predefined brush" instead of autobrush tip), and using sensors like pressure. You can test directly to paint on masks with presets like Basic_Airbrush or Basic_paint_shade and see what I mean. Another (better) workaround if you need precision work is to use the layer group + alpha disable trick (in a layer group, first put the base layer where you'll paint the mask with any color+transparency, and on top of it put the layers you want to be masked and click the alpha icon on them to disable alpha…  ) )
|
|
Registered Member 
|
This video http://www.youtube.com/watch?v=vhZfkN8ZhxM can brings you informations about. ( in the video , flow and opacity in Photoshop ) |
|
Registered Member 
|
Deevad, thanks, that was a very clear video.
Animtim, is there somewhere a more step by step explanation of the layer group + alpha disable trick? I have made several efforts to follow your instructions, but the only result is that I'm feeling dumber by the minute. Update: I'm finally understanding what you mean. I put up a temporary page on my website to show my interpretation of your "layer group + alpha disable trick": Oops, I was completely wrong about the layer stack. I took down the temporary web page. See Animtim's post below. The reason why I wasn't getting shades of gray on the transparency mask is because I was using the "Wash" Painting Mode. It needs to be "Build Up" Painting Mode. Elle
Last edited by Elle Stone on Thu Jun 07, 2012 3:41 pm, edited 1 time in total.
|
|
Registered Member 
|
Here is a simple screenshot showing what I mean:
 It is explained in the training DVD, and in my talk at LGM last year. Also this method is used in the default Comics templates to make the frames. |
|
Registered Member 
|
Animtim,
Thanks! for the screenshot. So I totally got the layer stack wrong for the "the layer group + alpha disable trick" and I've taken down the temporary page on my website. I will experiment forthwith using your screenshot as a guide. For anyone who happens to read this thread: make sure you are using "build up" rather than "wash" when you paint directly on a transparency mask (not sure if it makes a difference with the "layer group + alpha disable trick", but it certainly does when painting directly on a mask). Elle |
Page 1 of 1 (8 posts)
Bookmarks
Who is online
Registered users: Bing [Bot], daret, Google [Bot], Sogou [Bot]


